Saturday, September 24, 2011

This Just In: Pumpkins!

 I searched for the best in autumn decor to share with my friends and compiled this project...just in time for the leaves to fall....
I had so many requests for how I did them, I'm attempting my first tutorial. So bear with me!
Please note: I am a very visual person so am putting in quite a lot of photos! Hopefully this is a good thing!

First the list of supplies:

  • paper cutter
  • hole punch
  • glue
  • scissors 
  • paper, in solid and patterns
  • large brads
  • cup of tea (you'll see this is not on the optional list!)

Optional:
  • ink
  • tool for punching small holes
  • small brads
To Make the Large Pumpkin:
Cut the patterned paper into 16-18 strips, each 8 inches long and of varying widths (1/2-2 inches)
Cut solid paper into 16 strips, each 7 inches and 1/2 inch wide.
To Make the Small Pumpkin:
Cut the patterned paper into 16 strips, each 6 inches long and 1/2 inch wide.
Cut the solid paper into 14 strips, each 5 1/4 inches long and 1/2 inch wide.


 An optional step is to ink the edges of the strips. I think it gives the finished pumpkin more depth and definition! ~~either that or I'm just a glutton for ink-covered fingers!

Punch a hole in each end of the strips.

 Put one brad through the stack of solid strips and one brad through the stack of patterned strips. *Tip: these two brads will not be seen on the finished pumpkin, so it's a good place to use those strange colored brads you got in the mixed set and thought would never be used!

 With the patterned stack on top, put the last brad through both stacks of strips. This brad will be seen.

 *Tip: if you use a hard tool and press down the flanges of the brad, the pumpkin will maintain it's shape easier!


Create the shape by starting with the solid pumpkin. Divide the strips roughly in half, creating a circle. Then fan out the strips to make a ball.


 Now do the same thing with the patterned strips, creating an outer layer of pumpkinness!

 After you get the second layer fanned out, you'll probably have to reach through and re-align some of the inner pumpkin.


 BEAUTIFUL! Look at what a good job you're doing! This does get easier after you make a few!

 *Tip: Press down on the middle of the pumpkin as this will give it a better "squashy" shape. DON'T crease any of the paper as this will give it a terrible folded shape!


For the stem, use a small piece of paper about 3 inches long. This is a great time to use scraps!
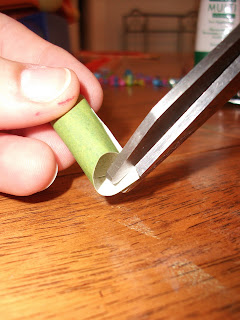
Roll it up and use a dab of glue to secure it in a nice little roll!
Use the scissors and trim the point off the bottom so it has a flat, glueable surface!

 Put a nice, thick layer of glue around the bottom of the stem and put it on the top of the pumpkin, covering the top brad. See. I told you you wouldn't see it! The glue will be kind of globby looking. Let it dry.

 VOILA! What an amazing looking Pumpkin you are creating!
 Cut some little strips of paper to create the vine tendrils. Wrap them around a pencil or other pencil-like object to give them their twirly look!


 Glue to the pumpkin or stem. Whatever looks good to you!

 This is what looked good to me!


 If you only have small brads (or you just want to use small brads!) a hole punch may make too large a hole so you can use a sharp tool to poke a smaller hole. A small brad may not be long enough to go through thick paper so you may have to use thin paper or less strips.


Now, go and DECORATE! Oh, and while you're at it, dig out the scarves and sweaters, too!
As a small, possibly unnecessary, footnote, I ran out of orange brads....so I created my own. I started with some brads that were a really awful blue color. Then there was the very bright orange nail color--the reason for which it was purchased eludes me. Anyway, the a few swipes with the nail color and Bingo! I have orange brads! 
 For anyone who wants to print these directions (such as they are) without the photos, here is a word-only version.
How boring....


First the list of supplies:
  • paper cutter
  • hole punch
  • glue
  • scissors 
  • paper, in solid and patterns
  • large brads
  • cup of tea (you'll see this is not on the optional list!)
Optional:
  • ink
  • tool for punching small holes
  • small brads
To Make Large Pumpkin:
Cut the patterned paper into 16-18 strips, each 8 inches long and of varying widths (.5-2 inches)
Cut solid paper into16 strips, each 7 inches long and 1/2 inch wide.
To Make Small Pumpkin:
Cut the patterned paper into 16 strips, each 6 inches long and 1/2 inch wide.
Cut the solid paper into 14 strips, each 5 1/4 inches long and 1/2 inch wide.


 An optional step is to ink the edges of the strips. I think it gives the finished pumpkin more depth and definition! ~~either that or I'm just a glutton for ink covered fingers!

Punch a hole in each end of the strips.
 Put one brad through the stack of solid strips and one brad through the stack of patterned strips. *Tip: these two brads will not be seen on the finished pumpkin, so it's a good place to use those strange colored brads you got in the mixed set and thought would never be used!
 With the patterned stack on top, put the last brad through both stacks of strips. This brad will be seen.

 *Tip: if you use a hard tool and press down the flanges of the brad, the pumpkin will maintain it's shape easier!


Create the shape by starting with the solid pumpkin. Divide the strips roughly in half, creating a circle. Then fan out the strips to make a ball.


 Now do the same thing with the patterned strips, creating an outer layer of pumpkinness!

 After you get the second layer fanned out, you'll probably have to reach through and re-align some of the inner pumpkin.

 BEAUTIFUL! Look at what a good job you're doing! This does get easier after you make a few!

 *Tip: Press down on the middle of the pumpkin as this will give it a better "squashy" shape. DON'T crease any of the paper as this will give it a terrible folded shape!

For the stem, use a small piece of paper about 3 inches long. This is a great time to use scraps!
Roll it up and use a dab of glue to secure it in a nice little roll!
Use the scissors and trim the point off the bottom so it has a flat, glueable surface!

 Put a nice, thick layer of glue around the bottom of the stem and put it on the top of the pumpkin, covering the top brad. See. I told you you wouldn't see it! The glue will be kind of globby looking. Let it dry.

 VOILA! What an amazing looking Pumpkin you are creating!
 Cut some little strips of paper to create the vine tendrils. Wrap them around a pencil or other pencil-like object to give them their twirly look!


 Glue to the pumpkin or stem. Whatever looks good to you!


Wednesday, February 9, 2011

Kind Words....

I have now started selling the scrapbooks I enjoy making so much! Here's a link to my shop where you can look at samples of my work and order one for yourself! GingerShop

Nice things people have said about the Scrapbooks I've made!

* I love the scrapbook you made for my baby's shower. It's precious! ~M.B. from Texas

* I LOVE my book! I look at it every day! And I keep it on my coffee table so everyone who comes over can see it! ~G.W. from Nevada

* Honestly, it's the most beautiful book I've ever seen! I love all the details! ~V.D. from Alaska

* The scrapbook you made from my birthday party is priceless! I love it! ~J.L. from Missouri

*The GingerShop scrapbook pages are more than wonderful! I was very pleased with the one's I had done, they were even better than I had imagined. What a terrific way to capture your memories. ~D.R. from Missouri

Saturday, March 13, 2010

News from my little sewing room....

I am loving the adventure that is creating Christmas Gifts! I even got carried away with the whole stocking thing and am making more than I need for gifts! It is just so much fun!

A zany side note:

I was using a very old pincushion which had gotten quite soft and I could tell there were some needles stuck in side of it. So I started pushing them out. After getting out 5 or 6, I decided this particular pincushion had lived a full and happy life and now deserved to rest in peace! So I cut it open and used a magnet to fish out the needles from the wood shavings.


Every time I stuck in the magnet it came out with a load of needles!


When it was all said and done, there were 66 rescuced needles...of every shape and size! There were quilting needles, cross-stitch needles, embroidery needles and, I think, every other kind of needle! I don't even know what some of them are for. There was one that the pointed end was a triangle and some had a half hole above the hole! There were a few that were the tiniest needles I've ever seen! A few were worn out and a few were bent!


I know you're probably wondering why in the world I would go on about such nonsense, but I found it most entertaining! So you must suffer along with me!


Saturday, January 30, 2010

The Christmas Count-Down Has Begun!


I have this lofty goal of making all my Christmas gifts next year. I always have high aspirations, but never start soon enough, so usually only a few people get genuine, one-of-a-kind, hand crafted creations! Sooooo...I'm thinking, if I start now, I have a fair chance of getting this done!

Project Number 1: Christmas stocking for nephew.
I am attempting something never before seen in the Jennifer realm of creativity...Crazy Quilting.
As someone who knows me all too well said, "Jennifer doesn't sew. She thinks about it. Plans it. Even buys fabric. But she NEVER sews!"
Well....I'm here to tell you, Jennifer is sewing!
I went through all the piles of fabric in our possession and found all the Christmasy stuff!
I found a pattern and between that and Googleing (is that a word?) "How to Crazy Quilt," I set off!
So far I'm liking this project, which is a good thing. However, I do wonder what we ever did before Google let us look the the creative genius of others who so helpfully post their inspired handiwork!


Saturday, January 9, 2010

Day 7 of 7

So we've come to the final day of our Dresses Challenge!
I wore my wonderful reversible Coldwater Creek skirt from Day 1. (other side, of course!)
My newest splurge on myself, my rose sweater from GAP! So cozy, I love it! Don't know if you can see it, but the lacy tank is from Rue 21 and brown tights from Old Navy.
During housework, I'm featuring a vintage apron, hand-made and worn by my Grams! She gave us all her old aprons, it's wonderful! Doesn't take long wearing one to figure out why our Grandmothers always wore one!
What!?! How long has it been since I watered this plant????
My pink pearl earrings were a gift from a co-worker ages ago and the necklace was a gift from some of the volunteers at TLC in South Africa.
My photographer getting creative! I think she just wanted everyone to see my hair (worn messy today! :O ) which she cut!


Friday, January 8, 2010

Day 6 of 7

Here we are, inside...watching the snow fall and enjoying the warmth of the house! However, the wind is not blowing quite so much today and I really should go out and shovel! ...but, but...I'm having so much fun looking at my Altered Book from my sister..... Ohhhhh! I must have some will power in there somewhere!
Every picture taken of me today turned out miserably so we're stuck with these!
The Outfit: Black suede skirt from Coldwater Creek! (hand-me-down, yippee!)
Sparkly silver knit top from White Stag, Christmas gift several years ago.
Crop royal blue Rue 21 sweater, Christmas gift this year from my sister.
Black George socks, I bought because they're wonderful!
The Accessories: Earrings were a gift from my Grandma a few years ago.
Bowl from an Africa market filled with pinecones....from the Christmas decor box! I did not, however walk around carrying it... Also to note, the adorable, hand-made stockings on the wall, courtesy of Derrillynn!
The Do: Brown plastic comb headband. Nothing special, just nice and easy!
And since I'm obviously having a love affair with my socks, I have included a special photo of them! *sigh*